To be added for annual accounting (3.5.0):
To associate an account with a host click on the individual account below the Account type. The section on the far right lists all the associated account hosts available in the scenario. [If a host has been associated with a previous account, it will not appear in the list.]. Click on the required host.
--------------
Annual accounting is a custom assessment method for regulated water in resource assessment module. The general principles for an annual accounting system are:
- An available resource is calculated during a defined water year;
- Allocation of the resource is made to different account types;
- Each account type’s allocation are distributed between accounts linked to this account type; and
- Any allocated water that has not been carried over at the end of the defined water year will be returned to the available resource for allocations of next year.
An annual accounting system set up in Source follows these principles.
Enabling annual accounting
Firstly, create an annual accounting system as follows:
- Choose Edit » Resource Assessment... to open the Resource Assessment Explorer; and
- Right click Resource Assessment and choose Add Annual Accounting.
Figure 1 shows an example of an annual accounting system.
Figure 1. Annual Accounting, Configuration
The next section explains all the tabs available in the annual accounting dialog.
Configuration
This tab provides an overview of the annual accounting system. The parameters that need definition are explained in Table 1.
Table 1. Annual accounting, Configuration tab
| Item | Description |
|---|---|
| Owner | This lists all the owners that have been configured using the Ownership Setup dialog (refer to Ownership in Source) |
| Debit Type | Determines how water is deducted from all accounts associated with this continuous accounting system; based on either order or extractions. |
| Start of Water Year | Day-month that the water year starts. |
| Usage to date | Represents how much of the water allocated has been ordered or used by water users in the water year to date. There are two options available - Usage From Function and Usage From Account Host. When losses need to be considered, an expression may be required to account for this. |
| Storages | Lists all the water storages in the project. Tick any storage you want to use. |
| Inflows | Lists all the inflow in the project. Just like the storages, tick any inflow you want to run in this project. The recession factor of each inflow can be changed using the corresponding Function Editor. |
| Other Resources | A list of resources that can affect the annual accounting system. Once you enter a name, you can enter a function for it. |
| Commitments | A list of commitments that can affect the annual accounting system. Once you enter a name, you can enter a function for it. |
Accounts
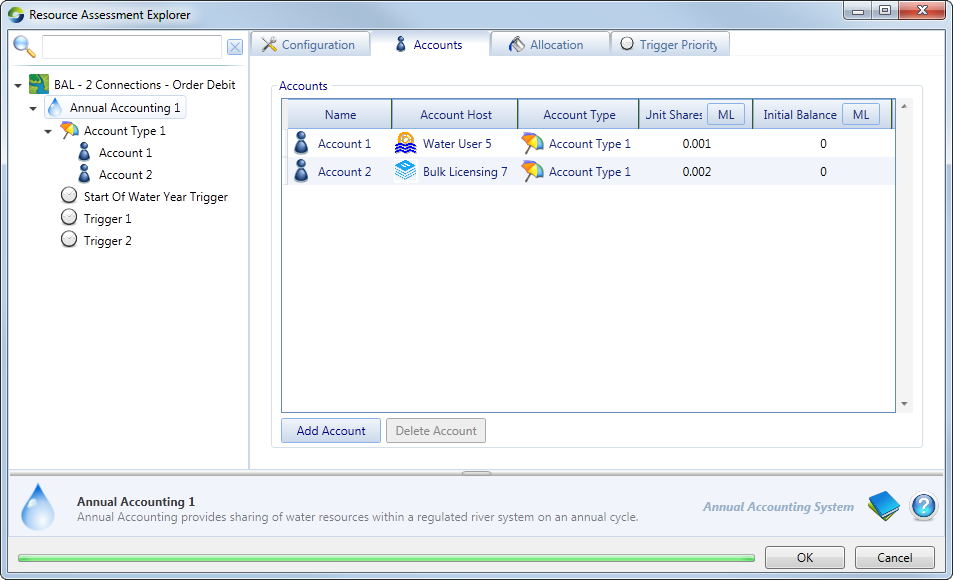
This tab provides a summary of all the accounts in the annual accounting system. As shown in Figure 2, you can add or delete accounts using the corresponding buttons below the Accounts table. Each of the parameters in the Accounts table is explained in Table 2.
Figure 2. Annual Accounting, Accounts tab
Table 2. Annual accounting, Accounts tab
| Item | Description |
|---|---|
| Name | Name of the account. |
| Account host | Node that the account is associated with. |
| Account type | Type of account. This is configured under the hierarchical item Account Type. |
| Unit shares | |
| Initial balance | The initial account balance. If you are going to use the initial account function, you need to ensure that there is sufficient water in storages to cover the total initial balances as well as the required reserves and TOL balance. If the initial balances are set too high a warning message will be generated and the results may not follow the required logic. |
Adding accounts
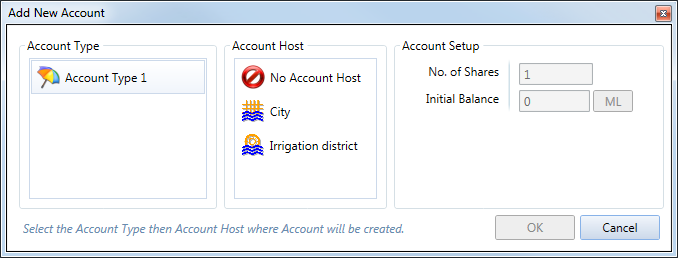
Click Add Account to open the Add New Account dialog (shown in Figure 3) and add an account in the table. The number of hosts available in a scenario will determine the number of accounts in an account type. Hosts in a scenario consist of water users, bulk licensing node and the environmental demand node.
Figure 3. Annual accounting, Accounts tab, Add New Account
Allocation
The Allocation tab shows how resources are distributed, along with the proportion that is carried over (as shown in Figure 4). This view changes with how the Account type has been configured, in particular the Method to apply for this account type in ARA table parameter.
Figure 4. Annual accounting, Allocation tab
Off-Allocation System
To add an off-allocation system, right click Annual Accounting and choose Add Off-Allocation System. Refer to the Off Allocation node for more information.
Account Type
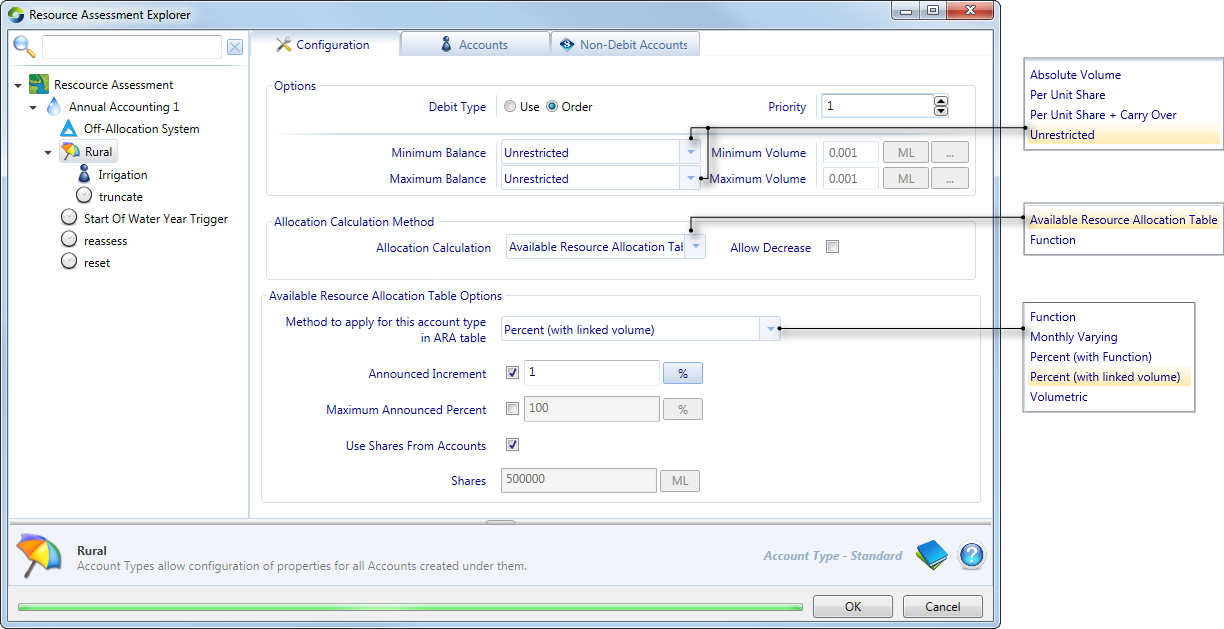
An annual accounting system may contain several account types. Each account type can also include many accounts. As shown in Figure 1, right click on the annual accounting system and choose Add Account Type. The resulting window is shown in Figure 2.
The parameters that must be defined are described in Table 1.
Figure 2. Annual accounting, Account type
Table 1. Annual Accounting, Account Type, Configuration
| Item | Description |
|---|---|
| Debit Type | Determines how water is deducted from all accounts associated with this continuous accounting system; based on either order or extractions. |
| Priority | A higher priority translates to resources being allocated prior to a lower priority user. |
| Minimum Balance | If a minimum balance is defined, then order or extractions will not be allowed if it will cause the balance to drop below the minimum specified. If choosing Unrestricted, also specify the Minimum Volume. |
| Maximum Balance | Defines the maximum volume of water which can be held in an account. If an allocation results in this limit being exceeded, then the excess amount is redistributed to other accounts. |
| Allocation Calculation | The default is Available Resource Allocation Table, which opens the ARA table. The options available for this are shown in Table 2. Choose Function to determine an account type's allocation using this method. This function may reference a wide range of variables available in the model, including allocations to other account types and resource assessment system. The Allow Decrease checkbox controls whether or not an account’s allocation can go down within the water year. |
The Method to apply for this account type in ARA table drop-down menu has several options available (as shown in Figure 2), each with a different set of input parameters. These are explained in Table 2.
| Method | Input parameters |
|---|---|
| Function | Enter a function using the Function Editor |
| Monthly varying | Choose the appropriate Calculation Method - either Interpolate or Threshold |
| Percent (with function) | |
| Percent (with linked volume) - default | Accounced Increment checkbox and corresponding field Maximum Announced Percent checkbox and corresponding field Use Shares checkbox Shares - Corresponds to the |
| Volumetric | Set the volume of the |
Once an account type has been created, right click to reveal the following items in the contextual menu.
- Add account - Here, you can configure Number of Shares, the Initial Account Balance and Previous Usage. To link the account to a host, choose the water user under Associated Account Host. The associated account lists all the water user nodes in the project. Once these have been configured, you will notice that the value configured for the Number of Shares relates to the Demand distribution item of the water user node (as shown in Figure 2). Refer to Demand distribution for details on configuring the water user node. Notice also that the Account distribution table (in the node's feature editor) indicates the details of the resource assessment system.
Figure 2. Annual accounting, Account type, Add account
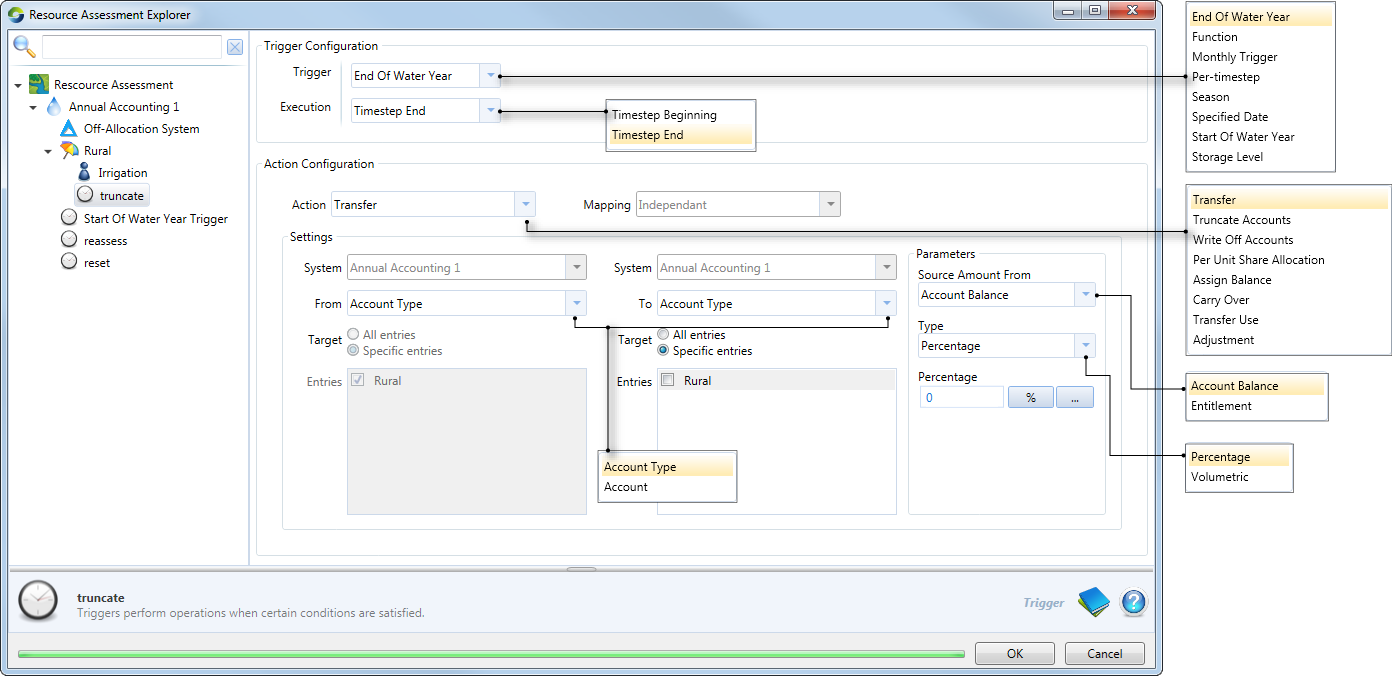
- Add trigger - Triggers are used to initiate or cancel certain actions for an account and can be added at any level in annual accounting. To add a trigger, right click the account and choose Add trigger. In the resulting right side panel (as shown in Figure 3), you must configure the Trigger and Execution options (as shown in Figure 3) and the resulting Action Configuration panel below will change depending on what is chosen. You can also trigger actions using a function. This is accomplished by choosing Function as the Trigger option. The format of a function should be like this: “IF A>B, 1, 0”, where “1” indicates the action will occur and “0” means the action will not happen. An account can have several triggers, each can be designed to initiate a particular action. You can rename or delete a trigger by right clicking the trigger and choosing the appropriate contextual menu option. After triggers are configured, you can prioritise them using Trigger Priority.
Figure 3. Annual accounting, Account type, Trigger
- Add usage limit - Right click the account or account type and choose Add usage limit. The GUI is similar for that in Continuous Accounting (here). You can limit water usage for all accounts by absolute volume or per-unit-share for moving water year or movable time window. An account can have several usage limits, each can be designed to initiate a particular limit. Just like triggers, you can rename or delete usage limits.
Configuring an Account Type
When account, trigger and water usage limit are all set up, you can go back to account type to configure and see summary information of all added accounts.
Click Account Type on the left hand panel, and make sure the configuration tab is selected on the right (Figure 2), set debit type, priority, minimum and maximum balance, minimum and maximum volume. If they are non-debit accounts, you need to tick the box Enable non-debit accounts, and then the availability threshold and repayment threshold become editable.
For allocation calculation method, there are two options from the allocation calculation drop down menu (Figure 2). One is as a function, where you can determine an account type’s allocation. The other is by using an available resource allocation table (ARA table). This function may reference a wide range of variables available in the model, including allocations to other account types and resource assessment systems. If an ARA table is chosen (Figure 7), configuration options will display for you to set detailed information.
Figure 7 Configuring Allocation Calculation Model
There are five methods can be chosen form the drop-down menu of method to apply for this account type in ARA table (Figure 7):
Function You set the function at this level.
Monthly varying You can set the calculation method as either interpolate or threshold.
Percent (with Function) This is similar to percent (with linked volume), difference exists at the annual accounting level allocation page which is discussed somewhere.
Percent (with linked volume) The default option for method to apply for this account type in ARA table. You can set Announced Increment, Maximum Announced Percent and Shares. If Use Shares from Accounts is ticked, Shares will get value automatically from account shares which is set at the account (rather than the account type) level.
Volumetric. You will need to set the volume at the annual accounting level allocation page which is discussed somewhere.
Accounts summary at Account Type Level
Clicking on the Accounts tab beside configuration at the top of the right hand panel (Figure 7), will show all the accounts created under this Account type.
You can also add an account simply by click the Add Account button below the list, or delete an account by selecting the account that to be deleted and clicking the Delete Account button. The Unit Shares and Initial Balance values are transferred automatically from the account but can also be edited here (Figure 7b).
Figure 7b. Accounts Summary Tab
Add an Off-Allocation System
Off-Allocation Systems are assigned at the top Annual Accounting level. Right click annual accounting and choose add off-allocation system from the drop-down menu. An off-allocation system can be configured using the properties panel shown in Figure 13. Detailed information of off-allocation system can be found under Off-Allocation Node
Configuration of Annual Accounting and Summary of accounts, allocation and trigger Priority
After account type and triggers are set up, you can go back to annual accounting to
- configure annual accounting
- see summary information of all accounts added
- set the available resource vs allocation table
- set trigger priority.
Figure 7c. Annual Accounting Configuration
Configure Annual Accounting
Click Configuration on the top of right hand panel. For option parameters:
- Owner: Users can set owner from Edit » Ownership..., right click resource assessment form the left hand panel and choose Enable Ownership from the drop-down menu. Users can edit details of owner from the owners table. Once ownership system are set up, users can choose any owner from the drop-down menu beside Owner in Figure 7c.
- Debit Type: determines how water is deducted from all the accounts based on either order or use
- Start of Water Year: Day-month that the water year starts for the system.
- Usage to Date: represents how much of the water allocated has been ordered or used by water users in the water year to date. There are two options for usage to date - usage from function and usage from account host. When losses need to be considered, an expression may be required to account for this.
The storage window lists all the water storage in the project. Users can tick any storage type they want to run in this project.
The Inflow window lists all the inflow in the project. Users can also tick any inflow they want to run in this project. The recession factor of each inflow can be edited by a constant or a function manager.
Users can also set Other Resources and Commitments by click the line under the Name of these two windows and a constant value or a function will also be available for editing the resources or commitments that added.
Accounts Summary
Accounts can be managed at Annual Accounting or Account Type levels.
Allocation
Click Allocation beside accounts on the top of right hand panel, Available Resource Versus Allocation displays below (Figure ?). The appearance of Allocation depends on the choice of method to apply for this account type in ARA tablein configuration of Account Type, The ARA table will display as the variations below (Figure ?).
- If function was chose in Method to apply for this account type in ARA table before, the Resource in the table will calculate automatically based on the function that was set at the Account or Account Type level
- If Monthly Varying was chose in Method to apply for this account type in ARA table before, users need to set the date for resource calculations. The calculation method was already chosen at an Account Type level, either interpolate or thresholds. Click the number below the Account Type name, the monthly varying window will display as in Figure ??. Users can set resource of each monthly manually or by import or export data from the Import andExport button below. If interpolate is chosen for calculation method, the Resource of the first column will calculated automatically based on current and next month values. More details about interpolate can be found in SRG. Ifthreshold is chosen, Resource of the first column will get value automatically form current month.
- If Percent (with Function) was chose in Method to apply for this account type in ARA table before, “Function” below the account type is editable because functions of this method cannot be set at a lower level.
- If Percent (with linked volume) was chose in Method to apply for this account type in ARA table before, the account type has a unit of (%) and the account type column can be editable by typing number directly to the table. Then the Resource column will calculated automatically based on account shares times percentage.
- If Volumetric was chose in Method to apply for this account type in ARA table before, the account type has a unit of (ML) and the rural column can be editable by typing number directly to the table. Then the value in Resourcecolumn is equal to that in Account Type column.
Figure ? Allocation summary
Figure ?? Monthly Varying Allcoation Window
Trigger Priority
Click Trigger Priority on the top of right hand panel, the trigger priority page is shown as Figure ???. The triggers will be separated into two types based on “timestep begining” and “timestep End”. For each type or triggers, users can choose the trigger and move it up or down to set the priority for this trigger.


