Note: This is documentation for version 4.3 of Source. For a different version of Source, select the relevant space by using the Spaces menu in the toolbar above
Climate data import tool
The Climate Data Import Tool provides a mechanism for rapidly and easily importing gridded daily rainfall or potential evapotranspiration (PET) data. It is particularly suitable for large catchments (eg. 50,000 km2 to 500,000 km2). Refer to General requirements for data and Climate data formats - ASCII grids for more information on the data that can be used for this tool.
Once a catchments scenario has been created, you can use the Climate data import tool as follows:
- Choose Tools » Climate Data Import Tool to open thedialog (shown in Figure 1);
Choose the climate data type you want to import from the Elementdrop down menu. You can import different climate data file formats for rainfall and PET;
Run the pre-processor separately for each climate variable. This process ensures that one time-series does not overwrite the other. Also, when organising climate data into folders, make the folders as specific as possible. For example, if you only want to load one year of data (and data is in a sub-folder representing years), use the sub-folder for the year as the input folder. Likewise, try to split PET and rainfall files into different directories so the tool does not have to search all climate folders.- Choose the type of data file format you want to load into the project from the File format drop downmenu. Click Select to load the root folder containing the data files. (eg. C:\data\Silo\asciigrid);
- If importing ASCIIGriddata files, define the search pattern (click the Search Pattern button). This informs the pre-processor of the last characters and extension of the climate data file name to be read. If the available search patterns offered are not suitable, you can edit thedrop down menu by clicking in the text box and specifying the appropriate search pattern;
- If importing ASCIIGriddata files, click Select to define a prototype raster, which should be *_rai.txt for rainfall and *_mwet.txt for PET files. For example, if a file is named 20070101_rai.txt, then the search pattern will be *_rai.txt. If a different file format is used, this step can be skipped;
- Specify Units. The ‘Units’ refers to the units of the data inside the grid e.g. rainfall and PET are most likely to be in millimetres. These units are applied to the data time series which are generated for each catchment.
- and the Cell Size; The ‘Cell Size’ is the cell size of the Subcatchment Raster (grid) which was input during the first step of creating catchments for the model. This raster will have been in projected coordinates and will most likely have a cell size in metres.
- Specify the Projection Information - this is the projection which the pre-processor assumes the sub-catchment map uses. Note that for importing ASCIIGrid files the projection of the DEM or sub-catchment map can be one of three (as shown in Figure 1). Click the Projectiondrop down menu;
- Specify the Modelling Period (the time period over which you want to import) - the Start date and End date. Clicking on these dates opens the date picker;
- Once all data has been entered, click Apply. A progress bar appears indicating that data is being imported. This process can take several minutes depending on the amount of climate data present; and
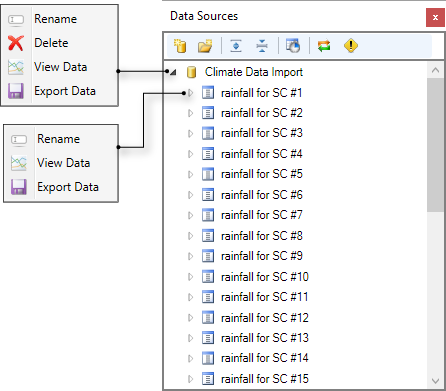
- Once loading is complete, the output of this tool can now be used as a data source in the Data Sources Explorer as shown in Figure 2.
Source will then project each climate grid according to the ‘Map Projection for Catchment Boundaries’ so that it overlays the catchment boundaries. It drills through the climate rasters at the interval specified by ‘Cell Size’ to get a data time series and determines which catchment the time series belongs to.
The Climate Data Import Tool dialog can now be closed.

