Note: This is documentation for version 5.4 of Source. For a different version of Source, select the relevant space by using the Spaces menu in the toolbar above
Associate Scenarios
Plugin was written by Kenneth Wong (Queensland Government Department of Science, IT, Innovation and the Arts)
General Info
| License | As-is, use at your own risk |
| Type | free |
| Current version | 2013/08/08 |
Plugin Description
Source supports multiple scenarios within a project. The user can therefore run catchment scenarios (to model the outflows from one or more catchments), and then use the modelled catchment outflows as inflows in a river system scenario, all within a single project. To automatically link the scenarios, a mechanism is needed to: (i) run the catchment scenarios in the desired sequence; (ii) feed the runoff flows from the catchment(s) into the river network; and (iii) run the river system scenario. The plugin enables the user to define the associations among catchment and river system scenarios so that these two types of scenarios can be seamlessly combined.
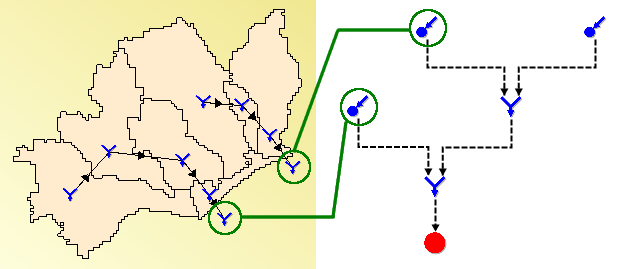
The principle of linking the outflow from a catchment scenario to the inflow of a river system scenario is shown below:
An association between a catchment scenario and a river system scenario means defining the equivalence of an outlet node from the catchment and an inflow node from the river system. Modelled data at the outlet node is automatically transferred to the inflow node.
Constituents
In addition to flows, constituents are also propagated through node associations. In order for this to happen:
- Record the parameter "Constituent Output" for all constituents that are to be propagated from an outlet node
- Define constituents with matching names for all scenarios involved
Using the plugin
To use the plugin:
Load the plugin library (MultipleScenarios.dll).
- Load the project.
- Load and configure all catchment and river system scenarios to be run.
Click the "Associate Nodes" (left) icon on the main menu bar:
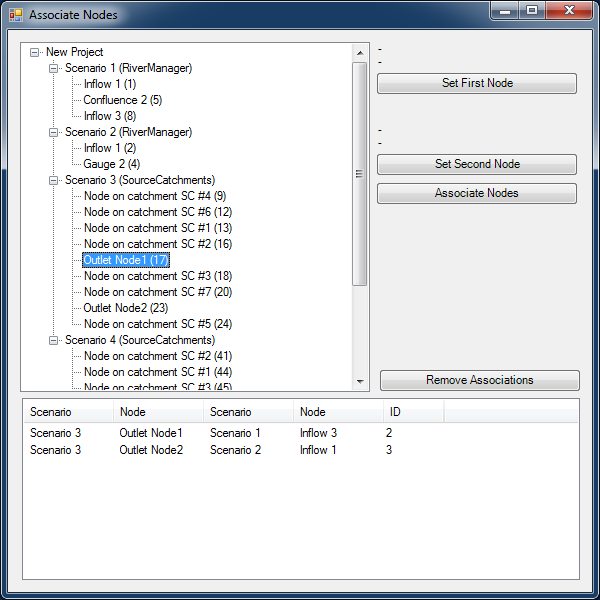
A new window will appear that enables nodes to be associated:
For each node pair you wish to associate:
- Select the outlet node in the first scenario (i.e. the node having a single upstream link) and click the "Set First Node" button;
- Select the inflow node in the second scenario (i.e. the node having a single downstream link) and click the "Set Second Node" button; and
- Click "Associate Nodes" to add the node associations to the list in the bottom panel.
Notes:
- A catchment node should have only one upstream link and a river inflow node should have only one downstream link. Once associated, the two nodes are effectively equivalent and modelled data from the catchment node is passed onto the inflow node.
- This functionality may in the future be integrated into the "Reload on Run" functionality for "Scenario Data Source". See RM-10186 - Getting issue details... STATUS for more details.
- Saving the project will save the node associations.
Once all node associations are defined, the "Associate Nodes" window can be closed.
Click the "Process Scenarios" (right) icon on the main menu bar:
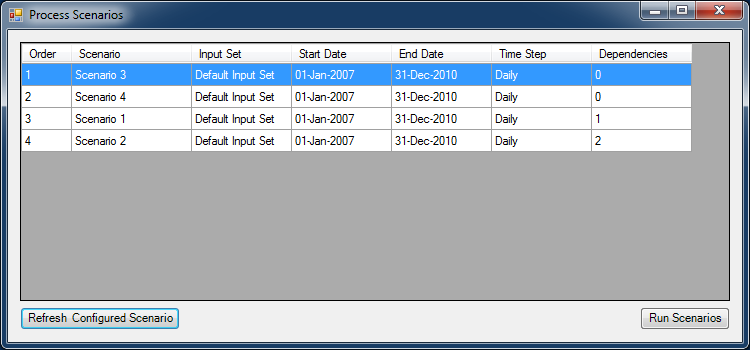
A window will appear showing the list of scenarios that have been configured and are ready to run:
Click "Run Scenarios" to run all scenarios shown in the list.
Notes:Each scenario must be configured prior to it being run by the plugin.
- The order in which scenarios are run is computed automatically based on the node associations.
All scenarios appearing in the list of scenarios are run sequentially without further user interaction. Results from all scenarios will be available in the recording manager. The results for the first nodes in the node associations will also be available as scenario data sources in the data manager.
- Once all scenarios are run, the "Process Scenarios" window can be closed.
Source Code
The plugin source code is available in the Source Community repository (https://bitbucket.org/ewater-ondemand/sourcecommunity) under SourceCommunity/CodePlayground/KennethWong/MultipleScenarios.
An example project called "MultipleScenarios.rsproj" is included within the plugin.


